Now that we know what we need to send and receive, and how it’s encoded, let’s generate the actual packet. Then, once we’re sure it’s working, we’ll convert it into an Nmap probe! In most of this section, I assume you’re running Linux, Mac, or some other operating system with a built-in compiler and useful tools (gcc, hexdump, etc). If you’re on Windows, you’ll probably just have to follow along until I generate the probe.
Sections
This tutorial was getting far too long for a single page, so I broke it into four sections:
- Part 1: setup
- Part 2: runtime analysis (windbg)
- Part 3: disassembling (ida)
- Part 4: generating probes (nmap)
Generating probes
Recall that packets are encoded by XORing each byte with 0xE5, and decoded the same way. That’s great for us – a simple program can encode and decode packets. Let’s write it!
I chose to write this in C because it’s one of my favourite languages and the code needed to XOR every byte is trivial:
#include <stdio.h>

int main(int argc, char *argv[])
{
    int c;

    while((c = getchar()) != EOF)
        printf("%c", c ^ 0xE5);

    return 0;
}
That’ll read characters from standard in, XOR them with 0xE5, then write them to standard out. Now we can compile it and run some test data through it (I called it the clever name, ‘test’):
ron@ankh:~$ vim test.c
ron@ankh:~$ gcc -o test test.c
ron@ankh:~$ echo "this is a test" | ./test | hexdump -C
00000000  91 8d 8c 96 c5 8c 96 c5  84 c5 91 80 96 91 ef     |....Å..Å.Å....ï|
0000000f
ron@ankh:~$
That looks just about right! But if you count the characters, you’ll see that we have one extra one: 0xEF. 0xEF is an encoded newline – oops! We don’t want newlines, but we DO want to null terminate the string. Running the echo with -n (no newline), -e (use character escapes), and adding \x00 to the end will take care of that:
ron@ankh:~$ echo -ne "this is a test\x00" | ./test | hexdump -C
00000000  91 8d 8c 96 c5 8c 96 c5  84 c5 91 80 96 91 e5     |....Å..Å.Å....å|
0000000f
ron@ankh:~$
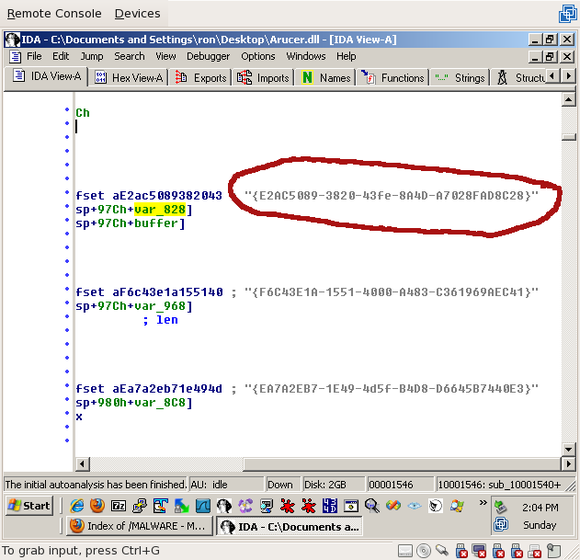
There we go! Now we need make a proper probe out of our string. Recall the string we found earlier:

As we know, it’s 0x27 bytes long including the null terminator (that’s what was passed to strcmpi()). So, we echo the string, with the 4-byte length in front and the 1-byte terminator at the end:
echo -ne "\x27\x00\x00\x00{E2AC5089-3820-43fe-8A4D-A7028FAD8C28}\x00"
In theory, that packet should provoke a response from the Trojan. Let’s try it out:
$ echo -ne "\x27\x00\x00\x00{E2AC5089-3820-43fe-8A4D-A7028FAD8C28}\x00" |
  ./test | # encode it
  ncat 192.168.1.123 7777 | # send it
  ./test # decode the response
(response)
YES
Success! The Trojan talked to us, and it said “YES”. Now all we have to do is create an Nmap probe!
Note that I am using an Nmap probe here rather than a script. Scripts are great if you need something with some intelligence or that can interact with the service, but in reality we’re just sending a static request and getting a static response back. If somebody wants to take this a step further and write an Nmap script that interacts with this Trojan and gets some useful data from the system, that’d be good too – it always feels better to the user when they see evidence that something’s working.
Anyways, the first step to writing an Nmap probe is to find the nmap-service-probes file. It’ll likely be in /usr/share/nmap or /usr/local/share/nmap or c:\program files\nmap. Where ever it is, open it up and scroll to the bottom. Add this probe (if it isn’t already there):
##############################NEXT PROBE##############################
# Arucer backdoor
# http://www.kb.cert.org/vuls/id/154421
# The probe is the UUID for the 'YES' command, which is basically a ping command, encoded
# by XORing with 0xE5 (the original string is "E2AC5089-3820-43fe-8A4D-A7028FAD8C28"). The
# response is the string 'YES', encoded the same way.
Probe TCP Arucer q|\xC2\xE5\xE5\xE5\x9E\xA0\xD7\xA4\xA6\xD0\xD5\xDD\xDC\xC8\xD6\xDD\xD7\xD5\xC8\xD1\xD6\x83\x80\xC8\xDD\xA4\xD1\xA1\xC8\xA4\xD2\xD5\xD7\xDD\xA3\xA4\xA1\xDD\xA6\xD7\xDD\x98\xE5|
rarity 8
ports 7777

match arucer m|^\xbc\xa0\xb6$| p/Arucer backdoor/ o/Windows/ i/**BACKDOOR**/
So basically, we’re sending a probe equal to the packet we just sent on port 7777. If it comes back with the encoded ‘YES’, then we mark it as ‘Infected’. Go ahead, give it a try:
$ nmap -sV -p7777 192.168.1.123

Starting Nmap 5.21 ( http://nmap.org ) at 2010-03-22 21:42 CDT
Nmap scan report for 192.168.1.123
Host is up (0.00020s latency).
PORT     STATE SERVICE VERSION
7777/tcp open  arucer  Arucer backdoor (**BACKDOOR**)
Service Info: OS: Windows

Service detection performed. Please report any incorrect results at http://nmap.org/submit/ .
Nmap done: 1 IP address (1 host up) scanned in 12.61 seconds
It successfully detected the Arucer backdoor! Woohoo!
Conclusion
So, to wrap up, here’s what we did:
- Execute the Trojan in a contained environment
- Attach a debugger to the Trojan and learn how recv() is called
- Get the callstack from the recv() call
- Disassemble the Trojan to learn how it works
- Find the addresses we saw on the callstack
- Determine how the simple crypto works (XOR with 0xE5)
- Determine what we need to XOR with 0xE5 ("{E2AC5089-3820-43fe-8A4D-A7028FAD8C28}")
- Determine what we can expect to receive ("YES" XORed with 0xE5)
- Write an Nmap probe to make it happen
Keep in mind that most malicious software isn’t quite this easy. Normally there’s some kind of protection against debugging, reverse engineering, virtualizing, etc. Don’t think that after reading this tutorial, you can grab yourself a sample of Conficker and go to town on it. If you do, you’re in for a lot of pain. :)
Anyway, I hope you learned something! Feel free to email me (my address is on the right), twitter me @iagox86, or leave a comment right here.

Comments
Join the conversation on this Mastodon post (replies will appear below)!
Loading comments...